

The third project in our Fall Sew-Along is a fitted long sleeve t-shirt, Burda 6820 pattern. There are three lengths and sleeve styles provided on this pattern, which offers you some options. The pattern envelope suggest using a two-way stretch jersey. I used a cotton and spandex blend floral print, which I have had in my stash for some time now. The vibrant print is a fun alternative to a basic t-shirt and I found that this fabric was easy to work with. I also made a matching infinity scarf, which paired with the t-shirt makes a warmer option for cooler temperatures. Like the previous projects, this post is to be used together with the pattern instructions. I therefore recommend that you read the first few post in our sew-along and that you have your pattern ready.
Style Details
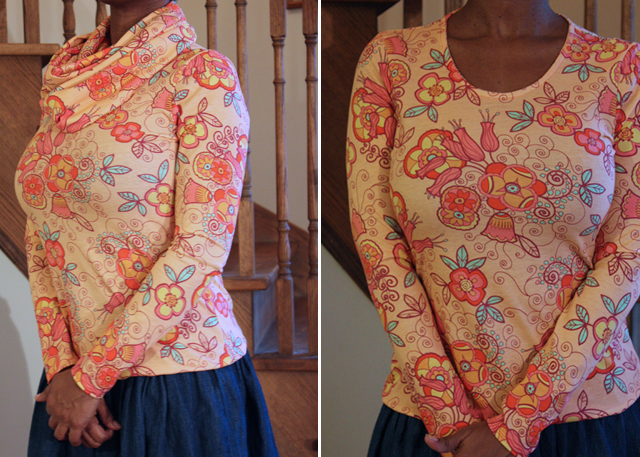
The t-shirt is fitted with long sleeves and a round neckline. The neckline is faced and topstitched. There is also topstitching on the sleeves and hemline. I also really like that this pattern does not have a centre back seam.
Getting Started
I started by reading through the pattern instruction sheets and I identified the steps needed to sew the t-shirt. There are only a view illustrations on the instruction sheets so you will want to carefully read through the written instructions. I decided to sew the entire project using my serger and used the sewing machine for some basting. I also did some hand basting in several areas and I suggest having a needle and thread handy. If you do not have a serger, I recommend using a walking foot attachment. Another recommendation would be to use a stretch stitch or small zig zag stitch for your seams (refer to your sewing machine manual). You can also finish the hem on your sleeves and shirt hemline with twin needles.
I was short on time and decided to forgo on pre-washing my fabric. However, I would recommend that if you are working with a natural blend fabric that you take the time to prepare your fabric to avoid shrinkage. I expect some shrinkage the first time I wash my t-shirt. I did however, cut the ends of my fabric evenly and took the time to fold accurately to best identify the grain.
Sewing The T-Shirt
- First I pinned the front and back pieces with right sides together at the shoulders and serged using the 5/8" seam allowance.

- I then stitched the short ends of the neckline facing together, folded the facing lengthwise (wrong sides together) and pinned the facing to the neckline as instructed. I then sewed the facing to the neckline and trimmed. I followed the instructions and folded the facing towards the inside of the neckline and ironed. I used hand basting to keep the facing in place and topstitched close to the edge of the facing, then removed the basting stitch.


- I then sewed the side seams and sleeves, right sides together, with a machine basting stitch (looser tension and larger stitch length).
- I then pinned and hand basted the sleeves into the shoulder and armhole area of the shirt. I machine basted the sleeves using 1/2" seam allowance. I was careful not to include the seam allowance on the sides and sleeve length.
- I then opened out the basted sides and sleeve seams and serged the sleeves along the armhole curve with a 5/8" seam allowance. I then folded the hems on the sleeves and used the cover-stitch machine to finish. This method then allowed me to sew the side seams continuously along the sleeves and into the sides of the shirt with the serger. To give myself a little more room in the fit, I used a 1/2" seam allowance. If you do not have a cover-stitch machine for the sleeve hems, you can use twin needles (refer to your sewing machine manual).


- The final step was finishing the hemline of the shirt. I folded the hem and used my cover-stitch machine to finish. As mentioned before you can also use twin needles for this step (refer to your sewing machine manual).

Changes I Made
I did not make any changes to the basic structure of the shirt, I did however make changes to the steps in sewing it together. The method I used made it easy for me to set the sleeves and finish my hems.
What I Will Change
I have been sewing for many years, but I have never made a t-shirt before. I am very happy with the finished t-shirt and I am looking forward to making more. This project came together very quickly. It is a great basic pattern, which leaves lots of room for making it one's own. Next time I might try making it with a contrasting colour on the sleeves and adding a contrasting band at the bottom.
I think it is very important to have the right tools, especially when working with knitted fabrics. The right tools can make a world of difference to how well your knitted projects come together. The main reason I did not make a t-shirt before is because I often find it frustrating and time consuming working with knitted fabrics.
My studio is equipped with lots of great machines and I really found my Janome Cover-Pro 1000CPX (cover-stitch machine) extremely helpful for this project, while on the other hand my serger was invaluable. I also used my regular sewing machine for sewing the facing and for machine basting. However, not everyone has a serger or a cover-stitch machine, and this is where the walking foot and stretch stitch can be very helpful (refer to your sewing machine manual). You may also want to have the right sewing machine needle for the job and be prepared to do some hand basting.
I hope that you have enjoyed reading this post and I look forward to seeing your t-shirts. Consider mixing the style features to see what you can come up with. If you are in the Barrie, Ontario area and will like to learn how to use a serger, check out one of our serger basics classes. You are also welcome to book studio time with our machines.
Remember to share your projects with us via Facebook and Instagram. Do not forget to use #cssewalong.
This Sew-Along project, crafted spaces of a T-Shirt is beautiful! It certainly can be worn as a nice casual, but when combined with the scarf, it looks rather dressed-up. I just love both looks. Your instruction was quite easy to follow and I love your attention to detail. A wonderful project and I am looking forward to seeing your next - - the jacket. Keep up the great work. You are a boss sewest!
ReplyDeleteThank you so much! I am really happy you like the project. The next project will be posted soon. Thanks for the visit and kind words. :-)
Delete